How to install an SSL certificate and switch to https: step-by-step instructions. How to install an SSL certificate on your web server (Apache2, Nginx)
Good day, ladies and gentlemen!
Today I will tell you how to install an SSL certificate on your website. And I’ll explain why using a secure connection should become a priority in 2018, and why web resources without SSL risk losing the lion’s share of their traffic.
I have already described what SSL is in one of the materials on iklife. In short, SSL allows you to use a secure data encryption protocol on your website. Data transmitted from the site to the client (visitor) will be securely encrypted. No villains will be able to access them, no matter how hard they try.
The implementation of this approach is possible thanks to mathematically related encryption keys. Information is transferred from the server (web resource) to the client (visitor’s computer) using three encryption keys. Two of them are closed. Both the server and the client have them. The third key is public and is used by both machines.
All three keys are related to each other, even if an attacker finds out the public key, he will never be able to decrypt the information due to the absence of the other two keys. Also, during the exchange of data between the client and the server, a session key is created, which is a guarantee of the security of your data.
Security and privacy are two things that the online community strives for. It is for this reason that trust in sites that do not use a secure connection is steadily declining.
Even browsers such as Google Chrome, Opera or Mozilla Firefox have begun to mark sites without https as unwanted. For now, they simply get by with a warning, but in the future, browser plugs may be placed on such sites, where the user must confirm that he is aware of the risk and takes responsibility in case of data loss.
The presence or absence of a secure connection can also be taken into account by search engines. While Yandex is currently saying that sites with http and https are indexed equally, Google is already seeing some changes. Soon, sites may be marked as unsafe and begin to drop significantly in positions.
For these reasons, we can conclude that establishing an encrypted connection is not just desirable, but necessary. All users, without exception, want their data to be safe and secure. So why deprive them of these benefits, especially since all this can be done absolutely free, using the same Let`s Encrypt.
Where can I get an SSL certificate?
Usually these certificates are sold by the hosting companies themselves. If you use one of them, then you won't have to worry about which one to choose. Just look at the list of offers and choose the cheapest or, on the contrary, more expensive.
The option from Let`s Encrypt is now popular. They are distributed free of charge, and many hosters support quick installation and connection.
In addition, you can find a lot of companies on the Internet that check domains and issue the appropriate authority to install an encrypted protocol.
There are even huge services that conduct a personal verification, after which they issue a personal certificate. It differs from the usual one in that the name of your company will be visible right in the address bar, next to the green padlock. This approach will show your clients that they are dealing with a serious organization. Of course, personal verification costs several times (or even dozens) more.
I will give you a list of the most popular services where you can buy SSL:
You can search for other companies on your own. You just need to enter the desired query into the search, all the necessary information will be at your fingertips.
Installing SSL on hosting
In this part of the review we will look at installing SSL on Beget and REG.RU hosting. If you have a different hosting provider, don't despair. Most likely, the instructions in this material will apply to your hosting server. Most of the control panels that hosting companies use are similar to each other.
SSL on REG.RU hosting
To install SSL through a form on the site, you need to go to the site itself and log in. Next, your path lies on the SSL connection page. After registration/authorization you will see this window.

If you purchased SSL directly from REG.RU, then you need to select the desired certificate in the drop-down list. After you have marked the one you need, you must upload the file with the private key. It is usually issued by the company that certified you. When setting up a secure protocol, you will be prompted to save just such a key.
In the case of Let`s Encrypt or sale by another service, the private key is sent to the specified e-mail. If the key is lost, you will have to reissue it, which promises a lot of problems.

When obtaining an SSL certificate from third-party companies, you need to select the second tab. There will be 4 fields where you must upload all the files that the certification authority issued to you.

Now all that remains is to select the hosting on which the certificate should be installed. Select the one you need from the list and click on the button to submit your application.

Please note that the required domain must be added to your hosting control panel. Immediately after submitting the application, if you are using shared hosting, SSL will be installed automatically. If we are talking about a dedicated server, then you will have to wait until specialists from REG.RU configure and install everything manually.
SSL on Beget hosting
To install a secure protocol on Beget hosting, go to the “Domains and subdomains” section, then click on the “Manage SSL certificates” button. It will be opposite the desired domain.
In the pop-up window, you can select installation options for the domain.

Let`s Encrypt is available for installation here. This certification center provides its services absolutely free of charge. You can use it or any other. To access the certificate settings, you need to use two adjacent tabs.
After ordering you will receive details by email. Most likely, no further action will be required from you. You will receive an email notification that the installation on your hosting has been completed, and you can start using SSL.
Problems may arise if the domain is hosted on third-party (non-Beget) NS servers. Then you will have to manually create an A record in your domain's DNS.
Installing SSL in ISPmanager
To install SSL in ISPmanager 4, you need to go to the control panel and the corresponding section. It is called SSL certificates.
In the right corner, find the “Create” button, after which such a window will appear before your eyes.

You need to enter all the necessary data manually. The “Certificate name” field is set arbitrarily. Everything else must be provided upon request. Select the “existing” type, and then “specify manually” in the “Use key” field.
The private key and certificate are issued by the service that conducts the certification. In the “Certificate chain” field, you need to enter two types: an intermediate one, and immediately after it a root one. Please note that the screenshot shows exactly how these two keys should be located relative to each other.

If errors occur during installation, double-check all entered data for extra spaces and symbols.
As soon as SSL is installed, we must go to the “WWW domain” section and check this box there.

In the field circled in red, you must select the desired name, which we arbitrarily specified when setting up SSL.
In ISPmanager 5 this process is not much different, however, I consider it necessary to describe it too.
Go to the section of the same name, which is located in “WWW”. I think you'll notice it right away.


The service will prompt you to select the type of certificate - select “Existing”.

We will need to fill in all the fields (name, keys and the certificate itself). They are issued by the company from which the certificate was purchased.

At the final stage, we need to go to the WWW domains section and find the one we need from the list. Double-click on the domain and then go to the parameters.

Check the “Secure connection” and “Enhanced security” checkboxes and select the desired SSL certificate in the drop-down list.

Ready! Your site will now use a secure connection.
Installing SSL on CPanel
To connect SSL on Cpanel hosting, you need to go to the appropriate section on your control panel. It is located in the “Security” tab.

Now you need to click on the “Manage sites with SSL” button.

Select the desired domain.

After this, a window for inserting data will open. We enter the certificate itself, the key and the chain. All data can be obtained on the website of the company from which you ordered this service.

Enter the certificate data (after BEGIN CERTIFICATE). Ends with END CERTIFICATE. Next, insert the private key and certificate chain.

The private key begins with the words “BEGIN RSA PRIVATE KEY”.

Here the intermediate certificate is inserted first and then the root certificate. The end of the first and the beginning of the second should be located as shown in the screenshot.
Now we just have to complete the installation. To do this we press the appropriate button.

Redirect from http to https
After installation, you will want all users to work over a secure connection. Yes, and search engines must do the gluing, otherwise there will be some kind of confusion: the same site with http and https will be considered as two different ones. We need to prevent this from happening. Therefore, we must set up redirects.
This is usually done using CMS tools or an htaccess file. In WordPress, for example, you can configure automatic redirects from an unsecured protocol to a secure one. But here I would like to note that not all content management systems can support such a function. For this reason, a redirect can be implemented using the htaccess file, which is available on almost any website.
Just add this piece of code to the beginning of the file and voila - your site has a 301 redirect from http to https.
RewriteEngine On
RewriteCond %(HTTP:X-Forwarded-Proto) !=https
RewriteRule .* https://%(SERVER_NAME)%(REQUEST_URI)
Now we can check for redirection by simply going to the site without specifying a protocol (or with the http protocol). If we did everything correctly, we will be transferred to https://site.ru.
Please note that after establishing an https connection as the main one, your resource may suffer some temporary problems with indexing. This will happen over the course of several months. To minimize damage and speed up the merging of two versions of the site, you must follow a number of instructions.
For example, add the Host line to the robots.txt file indicating the main mirror of your web resource. You also need to specify the https protocol there so that search engines consider this option a priority.
You can also notify search engines about protocol changes using special tools. Yandex.Webmaster has a corresponding section called “Moving a site”. Indicate in it that your project has “moved” to use a secure connection. As soon as possible, Yandex will try to take this information into account and update the search database in accordance with the new data.
Conclusion
In this article, I talked in detail about how to install SSL on your website. Thanks to the built-in tools in virtual hosting, you can easily and without any problems implement an https connection for your project. In the same Beget or REG.RU, doing everything is quite simple. And given the fact that it is now possible to install a free version, this must be done as soon as possible.
By the way, do not forget to check the SSL certificate on the site. If everything is done correctly, you will always be redirected to an https connection.
Do you want to create your own blog and make money from it? Then I invite you to . In it you will receive all the necessary knowledge to create your website on WordPress and apply it in the field of search engine promotion and optimization of your project.
Tell us, did you succeed in installing an SSL certificate for your web resource?
Installing an SSL certificate
To install the certificate you will need:
- Certificate file and certificate chain. The certification authority sends this data to the certificate owner's mailbox.
- Certificate key. You must have it. The key is generated before ordering a certificate; a CSR request is generated based on the key.
- Root access to the server.
Instructions for installing an SSL certificate on a domain using the ISPmanager panel
After issuing the ordered certificate, you will receive all the necessary files by email, which was specified when ordering.
1. Log in to ISPmanager under the user who owns the domain. By logging in as root, you can do this like this: ISPmanager - Users - select the user - click "Login" (at the top right there is a button with a picture of a ladder and a door).
Note: do not forget to enable SSL for the user (ISPmanager - Users - double click on the user - "Permissions" tab)
2. In the World Wide Web section - "SSL certificates" - at the top right is the "Create" button. Specify "Certificate Type" - existing and fill in all fields:
Certificate name- the name of the certificate under which it will be displayed in the system. May contain letters of the Latin alphabet, numbers, dots, as well as the signs _ and -
Private key- specify the contents of the private key file
Certificate- specify the contents of the SSL certificate file
Password- specify if the certificate key is encrypted (usually not required)
Certificate chain- Certificate bundle: a chain of certificates that signed this certificate. More details about chains, depending on the type of certificate, can be found in a special article.
3. After successfully adding a certificate in the "WWW domains" section, you can enable it for the site (double click - check the "SSL" box - select the desired certificate from the list)
4. A detailed check of the installed certificate is available at the following links:
Manual installation of an SSL certificate
Apache web server
If ssl requests are processed by Apache, then the certificate is installed in the Apache configuration file. You can check which web service responds to port 443 (ssl) with the command:
- Linux:
- FreeBSD:
To install the certificate, open the Apache configuration file. On FreeBSD this is /usr/local/etc/apache22/httpd.conf. Debian - /etc/apache2/apache2.conf. Centos - /etc/httpd/conf/httpd.conf. Find your domain's VirtualHost.
Sometimes you can find blocks
Create a block
- /var/www/user/data/www/domain.com - path to the home directory of your domain.
- /path/to/ca.crt - root certificate file.
Restart Apache with apachectl restart or apache2ctl restart
Nginx web server
If ssl requests are processed by Nginx, then the certificate is installed in the Nginx configuration file.
Open the Nginx configuration file. On Linux - /etc/nginx/nginx.conf
Create a server module for SSL connection. Example:
Server ( listen 10.0.0.1:443; server_name domain.com; ssl on; ssl_certificate /path/to/domain.crt; ssl_certificate_key /path/to/domain.key ; )
- domain.com - your domain name.
- 10.0.0.1 - IP address where the domain is located.
- /path/to/domain.crt - the file where the certificate is located.
- /path/to/domain.key - the file where the certificate key is located.
Certificate chain is added to the file with the certificate.
Let's take the example of Comodo Positive SSL. The certificate authority sends the files domain.crt, PositiveSSLCA2 and AddTrustExternalCARoot. The certificate chain will be the contents of the file PositiveSSLCA2 + AddTrustExternalCARoot. As a result, the domain.crt file should contain the domain certificate + PositiveSSLCA2 + AddTrustExternalCARoot certificates.
Restart Nginx
- Linux:
Multiple SSL certificates on one IP address
If multiple certificates are used on the same IP address, the browser will receive the default server certificate, regardless of the requested server name. This is due to the behavior of the SSL protocol. The SSL connection is established before the browser sends the HTTP request, and the web server does not know the name of the requested server. Therefore, it can only offer a default server certificate.
A solution for running multiple HTTPS servers on the same IP address is the Server Name Indication extension of the TLS protocol (SNI, RFC 6066), which allows the browser to pass the requested server name during an SSL handshake, which means the server will know which certificate it should use for connections. Almost all modern browsers support SNI, but to use SNI the OpenSSL library must also support it. OpenSSL supports SNI since version 0.9.8f.
Useful Openssl commands
- Creating a key for an SSL certificate.
- Generating a CSR request:
- Remove password from key:
- View CSR data:
- Certificate data (check who issued it, for example):
- Check that the key matches the certificate:
The two values must match.
- Find out the request length:
- Check HTTPS output:
Creating a CSR request for Microsoft IIS
- Click on the server name.
- Then, from the Actions menu on the right, select Create Certificate Request. The New Request Wizard window will open.

- Enter all required information.

Click Next.
- In the next window you can leave everything unchanged. Click Next.
- Enter a name for your CSR file.

- Open the file using a text editor. To issue a certificate, submit your CSR along with the BEGIN and END tags.
Installing an SSL certificate on Microsoft IIS
- Click Start - Administrative Tools - Internet Information Services (IIS) Manager.
- Click on the server name.
- In the IIS section, open Server Certificates.
- Then, from the Actions menu on the right, select Complete Certificate Request. A wizard window will open.

- Upload the certificate issued to you by the certification authority. Then enter the name of the certificate (only the administrator needs it for further work).

- Click Ok and the certificate will be installed on the server.
- In order to install this certificate on the desired web domain, go to the Sites section and select the site for which the certificate was ordered. From the Actions menu on the right side of the page, click on Bindings. The Site Bindings window opens.

- In the Site Bindings window, click Add... The Add Site Binding window opens.

- From the Type menu, select https. In the IP address menu there should be the site's IP address or All Unassigned. Port - 443. In the SSL Certificate field, select your certificate.

Click Ok.
- Your certificate is installed.
When developing a site that deals with personal data, security should be the first priority. This rule is important not only for online stores, but also for popular social networks like Vkontakte and Facebook
SSL is a secure protocol like HTTP in that it is capable of receiving and transmitting data over the Internet.
The concept itself is a little confusing, but in principle it is not difficult to understand. If you own a website or simply want to learn more about SSL certificates, then this guide is perfect for you. Today, I tried to put together the most incomprehensible terms and tell beginners about them. Please take some time to read this article and also be sure to do a little research of your own on this topic. Security is an integral aspect in achieving the success of any project, and SSL is just a small part of all the tools for achieving success.
What is SSL?
SSL stands for Secure Socket Layers, a security protocol originally developed by Netscape. This is a process in which the transmission of data between the user and the server is encrypted and a third party will not be able to connect to this process.

It works on the principle of a digital passport, which confirms the data of both the user and the final web server. Once both identities are verified, SSL guarantees a secure connection over HTTP. This process is done using certificates. I have tried to break down the key aspects which include:
- Owner's name
- Serial number for identification
- Certificate expiration date
- Shared key used to encrypt information
- The certificate's private key used for decryption (usually this key is provided by the web server)
You don't have to fully understand the application of all this. In some cases, you can get a certificate even with more information. And none of this information affects the user; it only affects the connection between the server and the remote computer.
How to install an SSL certificate
You will surely understand how SSL works. This is a more complex form of data transmission, something like sending a message to a locked safe. You don't need to memorize this or know how it connects to the server, but it would be a good idea to at least understand the basic workflow before getting your own certificate.

They are obtained from various reliable (and not always) providers on the Internet. Each certificate has an expiration date, which means you'll need to renew it to keep your site secure (usually every year). This process seems tedious, but luckily most vendors will help you through the setup process.
First you need to generate a CSR or Certificate Signing Request. A CSR is needed before you can obtain any SSL certificate. You can create it yourself if you have administrative privileges on the web server. However, it is recommended to contact the host as in most cases, they do not allow clients to do this themselves. In fact, there is nothing wrong with this, it will even make the task easier.
Once you have the encrypted CSR, you can contact the provider. There are many verified profiles like Verysign and Thawte. Personally, I used this page with recommendations where you can find the perfect solution for yourself. Once you purchase the certificate, simply contact technical support and they will easily install the certificate for you.
Different types of certificate
In most cases, installation is done to your personal IP address. It will only be applied to the domain name or web server. Not everyone has the budget to purchase dedicated hosting, but luckily for all of us, there are other solutions available.
In general, there are 3 different types of SSL certificates that you can buy. Some providers offer free ones as a trial option, but even such certificates are still more secure than HTTP connections.
- Dedicated is the most protected type, which is also the most expensive. An HTTPS connection is the only verified connection for your domain name, determined by the specified IP address.
- Shared – web hosts that offer shared hosting sometimes have multiple domain names pointing to a single IP address. In this case, it will be much easier for the hoster to organize a connection on each server containing an array of different websites.
- Wildcard – These are somewhat similar to dedicated or shared SSL certificates, based on the server configuration. Wildcard will be defined by several subdomains. This is a very good solution if you are dividing your site into different subdomains.
If you're just starting out, I highly recommend you use shared SSL. This is the case if you cannot afford dedicated hosting or IP address. And even if you can, the cost of a dedicated SSL certificate is absolutely terrifying. But you can still consider this option if you want. However, since this guide is aimed at beginners, I think the regular one will be more than enough to get you started.
Step by step guide to obtaining
The best way to learn is to try. Let's try to explore the offer from Comodo from Namecheap. They have a very reasonable price tag which is perfect for beginners. And since we only need to go through this process, this material will serve the purpose of today's tutorial perfectly.
Generating CSR
To get started, we need to create an authorization request on the backend of our server. Every hosting company is different, but you can always contact technical support if any problems arise. This tool can be used to generate CSR.

Please note that most of this information must match the Whois of my domain name. I use the service whois-service.ru which allows you to get all the information for this form. If you have any other domain name privacy settings set, then you should take your own data so that the CSR matches.
Purchasing a certificate
Tariffs at Comodo vary from 450 rubles per year to almost 4 thousand. I prefer the EssentialSSL package, which costs only RUB 1,300 per year. This is not such a bad option, considering other options.

This plan provides the opportunity to return your money within 15 days if you are not satisfied with the certificate. In addition, your domain name will be protected at the subdomain level and even in the absence of www. Once we have added this package to your cart, you can proceed to the payment procedure.
After entering all the necessary account data, you will be taken to the final payment page. We have the opportunity to pay for the package using funds available on your account balance, using a credit card or payment systems. If everything is done correctly, you will be redirected to order confirmation forms (you will also receive an email).
Final installation
The CSR must be provided in the email received from the hoster. The key is more like a block of mixed symbols and keywords. We will need this in order to carry out SSL verification. Back again, let's find the SSL Certificates page and click Activate.
On this page we need to select the server type and enter the CSR key. I chose Apache+OpenSSL. This is the default setting for Apache, but if you're not sure, just double-check these settings. Please note that your web host must return you an even longer RSA key, which is needed for private authentication to the internal server interface. All we need to do is copy and paste the short CSR key into the block and confirm the entry.

We then generate an email sent to the “landlord” of the domain name. This email will contain information about your SSL certificate and how to activate it on your hosting. For this final form of confirmation, we will need the RSA secret key, as well as some additional information from the SSL packet.
It should also be noted that on some hosting sites you may not have SSL working when using shared server resources. Reg.ru allows you to update your own accounts to separate IP addresses so that they do not have problems. The SSL certificate installation form is quite simple, and it won’t take you much time to confirm.
Once your host has confirmed all the details provided, you should be good to go. You must understand that this can take up to several hours, or even days. Be patient and remember to check your email. Once the request is confirmed, try to access the site via HTTPS, and then all the details should be displayed in the address bar. It's always difficult to do something for the first time, so don't be afraid to ask questions of the person who provided you with the SSL certificate.
Managing a secure connection
I would like to invite you to read this article from Reg.ru support which will help you understand the process. Even if you are not a reg.ru client, you will still in most cases use cPanel to manage almost any remote web server.

The main advantage of doing the setup on a third-party host is that you won't need to make any (or at least very little) changes to the code! Once you purchase a certificate, most hosts will kindly install them for you. Once everything is done, your site will work almost identically over both HTTP and HTTPS.
You can check if the certificate has been authenticated by simply entering your project's address into your browser's address bar. You will see a small padlock icon, which indicates that a secure connection has been established between your computer and the remote web server. Some browsers even allow you to view the certificate if you click on the padlock icon.
Redirects.htaccess in Apache
If you're having trouble keeping visitors on HTTPS, you might want to consider using a redirect script. Typically, on Apache servers, this is implemented using a .htaccess file, which many web hosts allow you to configure directly in cPanel.
Below I have provided sample code that you can use to set up your own .htaccess file. It will allow you to redirect all incoming traffic to https:// with the www subdomain. You can remove the www so that all traffic is redirected.
| RewriteEngine On RewriteCond %(HTTPS) = off RewriteRule ^(.*)$ https://www.yourdomain.com/$1 RewriteCond %(http_host) ^yourdomain.com RewriteRule ^(.*)$ https://www.yourdomain .com/$1 |
RewriteEngine On RewriteCond %(HTTPS) = off RewriteRule ^(.*)$ https://www.yourdomain.com/$1 RewriteCond %(http_host) ^yourdomain.com RewriteRule ^(.*)$ https://www.yourdomain .com/$1
Additional files
The most annoying problem you'll encounter is specifying absolute URLs instead of relative ones. This will prevent you from displaying a fully secure connection, causing you to display a warning about the use of "unsecured elements" on the page. If you display any external media resources: videos, images, cascading tables, then this should be done locally. Below I give an example:
| "http://www.domain.com/css/styles.css" rel="stylesheet" media="all" type="text/css" /> |
In the first code snippet, you load a potentially insecure document into a secure page. This is exactly the method by which hackers can bypass encryption. In most cases, I do my parsing via javascript or VBScript. But to be on the safe side, make sure that no procedure (no element) goes directly through HTTP.
If for some reason you need to display a file using an absolute URL, then use HTTPS instead. If you have files hosted on external websites or servers, this can cause problems as you will not be able to confirm the security of other HTTPS connections. Try to keep all media files on the same IP address, then you will be able to avoid such problems.
In conclusion
I hope this introductory course from the site shed some light on the world of SSL. Web security is a growing industry that helps keep personal user data safe. All popular online stores, including those, have been using SSL for many years to .
I recognize that this is on a topic that can be read and fully understood. Just like programming, it’s important to immerse yourself in the documentation and be sure to conduct your own experiments. Of course, this is quite a tedious and boring activity, but in the long run it will give you a big advantage. If you know of any useful guides on this topic, be sure to share the links with other readers in the comments!
Before installing the SSL certificate, go to and ensure that the SSL certificate service is active:
Installing an SSL certificate via a form on the website

After submitting your application:
- the certificate will be installed automatically on the virtual hosting;
- on VPS and dedicated server, installation will be done manually by our system administrators.
Once the certificate installation is complete, you will receive a message to your contact e-mail.
Certificate does not work with www
As a rule, this means that you have ordered not Wildcard certificate, i.e. The certificate is valid only for the domain for which it was ordered, for example, mysite.ru. Such certificates do not apply to subdomains, including www.mysite.ru.
As a solution, you can set up redirection from http://www.mysite.ru/ to https://mysite.ru/, for this use.
Self-installation
If necessary, you can independently install an SSL certificate on your hosting and VPS using the following instructions:
How to install an SSL certificate on third-party hosting
To install an SSL certificate on a third-party hosting, you can use the instructions for self-installation via the control panel (see instructions above) or contact the technical support of your hosting provider. The site’s specialists do not provide advice on installing certificates on third-party hosting.
Greetings, friends! 🙂
Today's article will look at installing an SSL certificate. We will talk about how to create an SSL certificate yourself and connect it to the site to exchange information with users via the secure HTTPS protocol.
I’ll say right away that you can install an SSL certificate on a website in two ways: through the server control panel interface and by manually copying the certificate files with subsequent web server settings (Apache or Nginx) if your hosting does not have a graphical control panel.
Information on installing an SSL certificate will be presented in the form of step-by-step instructions, when compiling which I used the first method and my hosting TheHost, to the control panel of which (using ISPManager) I have access.
TheHost allows you to both install SSL certificates purchased from it and connect SSL certificates purchased from other suppliers.
Also in the hosting control panel you can create a free SSL certificate from Let’s Encrypt and a self-signed one and then install them.
We will consider all these options today, because... In practice, there are different situations that require different types of SSL security certificates.
Let's go :)
How to install an SSL certificate on a website: steps
I hope by now you have already decided what an SSL certificate is and what it comes in.
If we talk about how to connect an SSL certificate to a site, the whole process consists of several stages:
- Generating an SSL certificate. It consists of creating a self-signed certificate on the server yourself or generating a request to issue this document to a certification authority (CA).
- Connecting an SSL certificate to the site.
After this, you will need to make some settings for your website engine so that it correctly exchanges data with users via HTTPS, which we will talk about in the following publications, because Each platform requires an individual approach.
So, let's look at each stage in more detail, starting with creating an SSL certificate.
Creating an SSL certificate
Since all today's actions will be performed on TheHost hosting, you first need to create an account so that they are possible.
To do this, register on thehost.ua website, after which you will receive an email with your user credentials, as well as a link to your user account and hosting control panel.
As I already said, SSL certificates can be created in different ways. Let's start with the simplest method from a technical point of view, which will require a minimum of knowledge from you.
How to order an SSL certificate for hosting?
I’ll say right away that this method of creating an SSL certificate has three advantages over the others, which is why I strongly recommend that most people use it.
Firstly, even a child can generate an SSL certificate of this type: there is no need to download and run any utilities, or delve into the intricacies of how to install an SSL certificate on a server.
All you need to do is simply enter the necessary information about the site and your personal data. The creation and installation of an SSL certificate on the site will occur automatically.
Secondly, compared to ordering an SSL certificate from official registrars, hosting providers who act as intermediaries often introduce various promotions and bonuses, as a result of which the certificate can be purchased at a significant discount or even for free.
Official registrars, as far as I know, do not indulge buyers in this way.
Thirdly, compared to free certificates, commercial ones have a longer validity period. They can be issued for a year or longer, while free ones are valid for a few months, which is why they need to be constantly renewed.
And God forbid you forget to do this - users will not see your site at all, but only a message about a security threat on the entire browser screen.
To place an order, we first need to go to the user’s account through the website thehost.ua or using the link contained in the letter generated during registration. After logging in, select the side menu item “SSL certificates” and click the “Order” button at the top of the page.
After completing the steps, a dialog box will appear on the screen that looks like this:

Here we need to select the type of SSL certificate you want to buy and its validity period. The price of the service will naturally depend on these two parameters.
You can read more about the available SSL certificates that can be ordered through TheHost here - https://thehost.ua/services/ssl
I’ll say right away that this provider’s prices for an SSL security certificate start from $7 per year of use, which I have not seen from anyone else at the moment.
Depending on which plan you choose, you may or may not have some of the following steps. Keep in mind!
After selecting the required tariff, click Further and move on to the next step of creating an SSL certificate:

It involves generating a request to a certification authority necessary in order to obtain an SSL certificate.
The request must be in the form of a file with your encrypted personal data with the extension csr.
If you have already generated it (and I will tell you how to do this directly in the ISPManager of TheHost admin panel later), then at this step just enter its contents.
To do this, you need to select “Input existing CSR” for the “CSR input method” item, which is selected by default.
If you don’t have such a file yet or the format of your request was not accepted, then you can generate it here without going into details.
To do this, select “CSR and Private key generation” as the CSR input method in the drop-down list.
In this case, this dialog box will look like this:

We enter all the necessary information as carefully as possible, because... In the future, you will have to confirm it regardless of what type of SSL certificate you issue.
You can read about what data should be entered and where to get it from in the article about.

Here is the contents of your secret key, which will be used to encrypt transmitted information via the HTTPS protocol.
If you entered the text of an existing request, then you should already have this code and it is usually stored in a file with the extension key, coming to your email after generating a request through third-party utilities. Therefore, you will not have this step.
The next step again requires us to enter contact information for the administrator and technical support, which CA representatives can contact to confirm the information entered in the application for issuing an SSL certificate:


The next step is to enter an email to which a link will be sent to confirm the generation of an SSL certificate:

If you don’t have a ready-made email listed among the options in the drop-down list, then create one.
If you do not confirm the request, you will not receive a certificate, nor will you be able to count on compensation for the money spent on its issue.
Which is quite fair, because... TheHost does not issue the certificate itself, but orders it from official certification authorities.
Well, at the final stage you will need to select a payment method and the renewal period for the SSL certificate, for which it will be automatically issued upon expiration:

Click on Ready and all that now remains is to wait for the confirmation request for issuing an SSL certificate from the certification authority and the certificate itself.
Once you have it in your hands, all that remains is to connect it to the site. But we’ll talk about this a little later, when I look at all the ways to create SSL certificates with TheHost, which, as I said earlier, can be of different types.
Creating a self-signed SSL certificate
So, I showed you how to order the generation of an SSL certificate from official certification authorities.
However, there are situations when other types of certificates are needed. For example, to test website engine settings for HTTPS data transfer on a local server and test domain.
In this case, a free self-signed SSL certificate, which you can create with TheHost in a matter of seconds, is quite suitable.
To do this we go to ISPManager using the link from the letter received when registering on thehost.ua, or you can get to the server control panel directly from the user account in the following way:

If you have difficulty seeing what is shown in the picture, then to transfer to ISPManager from the user account you need to select the “Hosting” menu item, select the required server (there may be several in one user account) and click on the “To server” button, which becomes available after selection server.
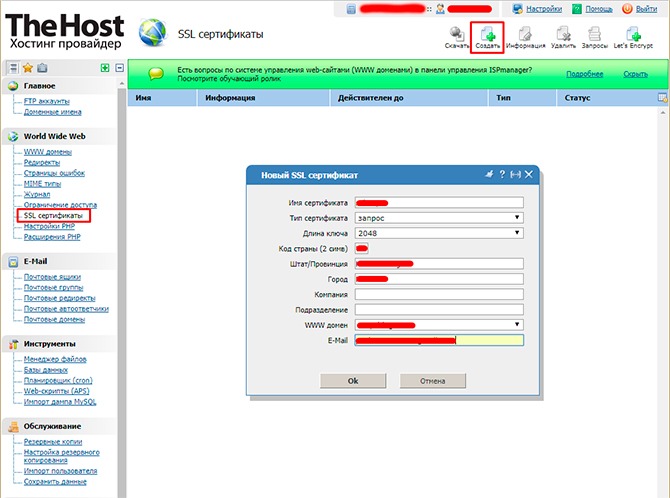
While in ISPManager, select the menu item SSL certificates and click on the “Create” button at the top of the page.
In the dialog box that appears, select for the field Certificate type value “self-signed”, after which the window will look like this:

We enter the necessary information, similar to what we specified when obtaining an SSL certificate from the CA, and then click “OK”.
The certificate will appear in the list of existing SSL certificates.
Please note that the advantage of a self-signed SSL certificate is that it is free and has virtually unlimited validity.
The downside is that it does not ensure data security, which is flagged in browsers and scares away your customers.
Connecting an SSL certificate issued elsewhere
If for some reason the certificates or their cost from TheHost did not suit you, and you ordered an SSL certificate elsewhere, but you have a website located on this hosting, then you can connect your certificate to your existing website.
You can do this in the same dialog box that was used to create the self-signed SSL certificate.
Only to add an existing document to the TheHost server, you will need to select the value “existing” in the “Certificate Type” field, after which the entire dialog box will take the following form:

Enter the information contained in your ready-made SSL certificate for the domain into the appropriate fields and click “OK.”
If you have any difficulties adding this document, you can always contact TheHost technical support for advice.
Creating an SSL certificate request from a CA
Well, another option available in this SSL certificate creation dialog box is to generate a request to issue this document to a certification authority.
This feature may be useful to you, as mentioned earlier, when ordering an SSL certificate not through your hosting provider, but through others, including when contacting a CA
directly.
You can generate a request to issue an SSL certificate for a domain directly on your work computer using special utilities.
The most common is OpenSSL, which is available on both Linux and Windows thanks to CygWin or the use of other Linux console emulators (the same Git command line supports Linux commands or the PuTTY utility).
There are also a lot of online request generators for issuing an SSL certificate. Here are the most popular ones:
- https://www.rapidsslonline.com/ssl-tools/csr-generator.php
- https://csrgenerator.com/
- https://www.ssl.com/online-csr-and-key-generator/
Also, these generators are provided by all official certification authorities and many hosting providers.
TheHost also has one, which is available in this window.
To launch it, select the “Query” value in the “Key Type” field, after which the dialog box will look like this:
Enter the required information and click OK. After this, csr and key files will be generated on TheHost server, which you can later use to issue a certificate.
To be able to use their contents, you will need to select an entry with the “Request” type in the list of all SSL certificates in TheHost hosting control panel and click the “Download” button at the very top of the screen, after which an archive with the specified files will be downloaded to your computer.
Open them with a regular text editor and copy the request code when applying for SSL certificates both through TheHost and other registrars.
How to get a free Lets Encrypt SSL certificate?
Well, and finally, I decided to leave a review of the method of creating the most necessary and popular version of the SSL certificate for a domain, which is available from TheHost.
We are talking about generating a free LetsEncrypt SSL certificate, which can be created in a matter of seconds.
Among its advantages, one can highlight not only the fact that you don’t have to pay for its design, but also the fact that the procedure for issuing it is the fastest of all those mentioned (at least with TheHost), because When generating, you will not have to indicate absolutely any additional information, except for the domain name of the site for which the document will be issued.
The only downside is that it is only available for 3 months, after which it will need to be extended.
So, to create an SSL certificate from Lets Encrypt, go to the “SSL Certificates” page in ISPManager and click on the “Lets Encrypt” button, after which the following dialog box will open:

Select from the list the domain for which the certificate will be issued and click “OK”.
After this, without any further questions, the certificate will be added to the list. If you view the information contained in it (you need to select a certificate and click on the “Information” button), you will see the following:

As you can see, TheHost provides absolutely identical information for all LetsEncrypt SSL certificates, simplifying and speeding up the procedure for issuing them.
If you wish, you can configure the SSL certificate and change the information contained in it at this stage. By the way, I strongly recommend doing this, because... this step will increase your trust with your users who decide to view the certificate data.
The absence of the owner’s personal data in it can seriously alarm them, and for some it can even serve as a signal to refuse to use this site.
So, I hope the creation of an SSL certificate was successful for you. Now all that remains to be done to successfully transfer data via HTTPS is to connect the SSL certificate to the site for which it was issued.
As a clear example, I decided to demonstrate connecting an SSL certificate to my test site, for which a subdomain was specially registered for this purpose - ssl.site. You can read about ISPManager using TheHost as an example in the article at the given link.
So, to connect an SSL certificate to the site in the ISPManager hosting control panel, open the “WWW domains” menu item, select the required one and click on the “Change” button, which becomes available at the very top of the page.
After this, the following dialog box appears on the screen:

To install an SSL certificate on the selected domain, we need to check the “SSL” box and select the name of the desired document from the drop-down list.
That's all. An SSL certificate is installed on the site. You could see for yourself how simple and fast it is thanks to TheHost and ISPManager, in particular.
Yes, it may look unsightly, but it copes with its tasks perfectly :)
Now all we have to do is configure the site engine so that it works correctly using the new HTTPS protocol. These will include redirects from HTTP to HTTPS, setting up mirrors, editing the sitemap and robots.txt, and much more.
But we will talk about this in the following articles, because... Each platform requires an individual approach.
To conclude the review of site settings in ISPManager related to SSL, I would like to draw your attention to the “SSL Only” field in the dialog box shown in the screenshot above. Using it, it is possible to make redirects from HTTP to HTTPS for a site URL at the Nginx web server level.
By checking this box, the following code will be added to the configuration file of the Nginx web server on the hosting:
If ($ssl_protocol = "") ( rewrite ^ https://$server_name$request_uri? permanent; )
You can take note of this method of organizing redirects from HTTP to HTTPS, especially if you do not use shared hosting services and hosting control panels, in particular, and need to configure a redirect.
The advantage of this method of redirecting traffic over a redirect in the site code is that it is faster. In quantitative terms, these changes are not significant, but with large project sizes they will become noticeable.
Verifying that the SSL certificate is installed correctly
After the SSL certificate for the site is installed and activated, the logical conclusion of this process will be to check for errors that may have arisen during the process.
They can be varied: from a discrepancy between the information in the certificate and that stored in the certification authority, to errors in the operation of the certificate itself.
To get a complete list of problems and scan your site for them, I recommend using the following services:
- https://www.ssllabs.com/ssltest
- https://www.digicert.com/help
As a conclusion, I would like to say that while reading the article, you yourself noticed how much the hosting provider and hosting control panel simplifies life when ordering, installing and configuring SSL certificates. You could especially feel this if you have ever manually established an HTTPS connection for a site on a server that does not have a control panel.
And this, I must say, is a good motivation to use the first type of hoster, where the user does not require a lot of time and knowledge.
This argument is especially valuable for people who have never been involved in web programming and website creation, but installing an SSL certificate on their websites is necessary.
Therefore, if you belong to this category, then I advise you to use the services of your hosting provider. I am more than confident that it will save you from unnecessary headaches.
Well, if you are still choosing one, then I would like to recommend TheHost, instructions for creating and installing an SSL certificate in the control panel of which were presented in this article.
That's all. See you again! 🙂
P.S.: if you need a website or need to make changes to an existing one, but there is no time or desire for this, I can offer my services. More than 5 years of experience professional website development. Work with PHP, OpenCart, WordPress, Laravel, Yii, MySQL, PostgreSQL, JavaScript, React, Angular and other web development technologies. Experience in developing projects at various levels: landing pages, corporate websites, Online stores, CRM, portals. Including support and development


- An educational resource for thinking and curious people
- Saint Venerable Barnabas of Gethsemane (1906), founder of the Iversky Vyksa Monastery
- How do prayers in front of the Old Russian Icon of the Mother of God help? The Old Russian Icon of the Mother of God is located
- Chernigov Gethsemane icon of the Mother of God Prayer to the Ilyin Chernigov icon
- Coconut panna cotta recipe with photo and banana Recipe Vegan panna cotta made from coconut milk
- Banana-nut sponge cake in a slow cooker, photo recipe Chocolate sponge cake with banana in a slow cooker
- Whole chicken baked with garlic and pepper
- Cod liver salads for every taste Cod liver salad with green peas
- Recipes for squash preparations for the winter
- Preparing a milkshake with fresh aromatic strawberries in a blender
- Lunar calendar for December dream book
- The magic of numbers. Why do you dream about the Face? Dream Interpretation dirty face in the mirror
- Personal eastern horoscope
- The great mantra of Shiva - Om Namah Shivaya Shivaya namah nama om meaning
- Dream Interpretation: why you dream of walking through a cemetery, interpretation of the meaning of sleep for men and women
- Lego Secret Figure Minifigures Series 17
- Real benefits and mythical harm of dates for the human body
- Curry with chicken and rice - exclusive recipe with step-by-step photos Rice with curry seasoning recipe
- Time delay prefix pvl Structure of the symbol
- Was Nicholas II a good ruler and emperor?