Update your pension program. Program for preparing personalized accounting data submitted by policyholders to the pension fund of the Russian Federation (PD SPU) for the regions of the Central Federal District
There are such report forms as SZV M, RSV-1, SZV-K and others. But in order for all reports to be compiled correctly, it is necessary to update the SPU PD on time.
They don’t accept the report to the Pension Fund of Russia, they require the SZV M form of a new form, I make a report to the PD SPU, where can I get a new form?
Perhaps you have old version programs there too old uniform SZV-M. To get started, you just need to update your program. After all, new forms and forms different reports, such as SZV-M, are not pulled up from the Internet. You can update the report form data only by updating the entire program.
How can I find out which version of PD SPU I have installed?
It's very easy to do. Open your program and see which version is written in the header. The date it was released is also written in the header. this version. Then just go to my website and watch latest version programs.
Will the data from the database be sold when the program is updated to a new version?
No, your data will remain in place. The developers foresaw in advance that the program would be updated, so updates occur without losing the database. If you are still afraid that something will happen to the database, do backup copy. To do this, go to the menu item “Tools” - “DB Backup” - “Create a backup copy”.

Program characteristics
- The program is designed for use on any local computers running Windows 2000/XP/Vista/7/8/10.
- Printing all documents on any printers (Russified and non-Russified, network and local).
- Easy migration to later versions by re-installing over an outdated version of the program.
- Ability to work with several companies in one database.
- The ability to organize both a local single-user database that does not require installation of a DBMS (by default), and a network multi-user database located on a remote server (FireBird DBMS).
- Does not require the user to know personalized accounting codes, output file formats, or filling rules individual information and personal data
Functionality
- The PD SPU software package is designed for filling out, printing and converting documents into electronic form:
SZV-STAGE. Information about insurance experience insured persons;
- SZV-CORR. Data on the adjustment of information recorded on the individual personal account of the insured person;
- SZV-ISKH. Information on earnings (remuneration), income, amount of payments and other remuneration, accrued and paid insurance premiums, periods of labor and other activities counted in the insurance period of the insured person;
- EDV-1. Information on the policyholder transferred to the Pension Fund for maintaining individual (personalized) records
- SZV-M. Information about the insured persons;
- RSV-1. Calculation of accrued and paid insurance contributions for compulsory pension insurance to the Pension Fund of the Russian Federation and for compulsory medical insurance in Federal Fund mandatory health insurance payers of insurance premiums making payments and other rewards to individuals;
- RSV-2. Calculation of accrued and paid insurance contributions for compulsory pension insurance to the Pension Fund of the Russian Federation and insurance contributions for compulsory medical insurance to the Federal Compulsory Medical Insurance Fund by the heads of peasant (farm) farms;
- RV-3. Calculation of accrued and paid contributions to the Pension Fund of the Russian Federation, used when monitoring the payment of contributions for employers paying contributions for additional social security;
- SZV-6-1. Information on accrued and paid insurance contributions for compulsory pension insurance and the insurance period of the insured person;
- SZV-6-2. Register of information on accrued and paid insurance contributions for compulsory pension insurance and the insurance experience of insured persons
- SZV-6-3. Information on the amount of payments and other remunerations accrued by the payer of insurance premiums - the policyholders in favor of an individual.
- SZV-6-4. Information on the amount of payments and other remuneration, on accrued and paid insurance contributions for compulsory pension insurance and the insurance period of the insured person.
- SZV-1. Individual information about the length of service, earnings (remuneration), income and accrued insurance premiums of the insured person.
- SZV-3. Individual information about the length of service, earnings (remuneration), income and accrued insurance premiums of the insured person.
- SZV-4-1. Individual information about the insurance experience and accrued insurance premiums for compulsory pension insurance of the insured person.
- SZV-4-2. Individual information about the insurance experience and accrued insurance contributions for compulsory pension insurance of the insured person (list form).
- ADV-10. Consolidated list of SZV-3 document forms submitted by the employer to the Pension Fund of Russia.
- ADV-11. Statement of payment of insurance contributions for compulsory pension insurance.
- ADV-6-1. List of documents submitted by the policyholder to the Pension Fund.
- ADV-6-2. List of information transmitted by the policyholder to the Pension Fund.
- ADV-1. Questionnaire of the insured person.
- ADV-2. Exchange Application insurance certificate.
- ADV-3. Application for issuance of a duplicate insurance certificate.
- DSV-1. Application for voluntary entry into legal relations for compulsory pension insurance in order to pay additional insurance contributions for accumulative part labor pension.
- DSV-3. Register of insured persons for whom additional insurance premiums for the funded part of the labor pension and employer contributions have been paid.
- SZV-K. Information about the work experience of the insured person for the period before registration in the compulsory pension insurance.
- SZV-SP. Information about other periods of activity of the insured person counted in the insurance period.
- SPV-1. Information on accrued and paid insurance contributions for compulsory pension insurance and the insurance period of the insured person to establish a labor pension.
- SPV-2. Information about the insurance experience of the insured person for establishing a retirement pension. It has a simple, intuitive user interface and allows you to enter all the necessary data in a user-friendly mode, process it and generate output documents both electronically and in printed form.
- Helps the user to calculate insurance premiums according to the tariff and at the additional tariff, calculate accrued and paid insurance premiums and other calculations.
- Implements preliminary check entered data in accordance with the Rules for verifying information submitted to the Pension Fund.
- Allows you to check electronic forms documents directly from the program using external programs checks CheckXML reporting and CheckPFR with the verification protocol displayed on the screen.
- Has the ability to create as a package of forms for reporting period, and upload individual packs to XML files in PFR format.
- Allows you to load packs of information from XML files in the PFR format into the program database.
- It has the ability to import user data from dBase III format files (dbf files) containing personal data, information about earnings, contributions and experience into the types of documents supported by the program or into the built-in directory of insured persons.
- Allows conversion the following types forms: forms SZV-6-1, SZV-6-2 and SZV-6-3 to form SZV-6-4, form SZV-6-4 to Section 6 of form RSV-1 since 2014, form RSV-1 from 2014 into the RSV-1 form from 2015, and also has a separate batch mode for converting files with batches of information on the RSV-1 form from 2014 into the RSV-1 form from 2015 without loading information into the program database.
- Allows you to import a directory of addresses from the Unified Address Classifier of Russia (KLADR) and use it for substitution when entering addresses in information about insured persons.
- Allows you to print blank Pension Fund forms.
- The program keeps a log of loaded, unloaded and checked packs.
- The program is equipped with help for working with the program.
Version 5.9.5 from 06/01/2017
Fixed loading error SZV forms 6-1
+ Fixed an error that occurred when filling out an application for a pension, when attaching files with scans of documents in operating rooms Windows systems XP
+ Fixed uploading to XML forms SZV-KORR, sometimes monthly payment amounts were not included in the output file
+ For the SVZ-KORR form, the entry of information has been improved (For adjusted periods from 2002 to 2009, the ability to enter “Information on adjusting data on earnings (remuneration), income, the amount of payments and other remunerations accrued in favor of the insured person is blocked”)
+ Added page numbering in the printed form SZV-STAZH
+ Added loading from XML forms SZV-STAZH, SZV-ISKH, SZV-KORR
+ Fixed errors in uploading to XML forms SZV-ISKH
+ For the forms SZV-STAZH, SZV-ISKH, SZV-KORR, the fields “Name of manager” and “Position of manager” are made mandatory for entry
To install the program, download the attached archive to your computer. Unpack the downloaded archive and run the installation file PD_SPU_2010_xxx.EXE (where XXX is the version number)
List of files contained in the archive:
1. PD_SPU_2010_xxx.EXE (program installer)
2. History.txt (entire history of changes)
3. User Manual.pdf (User Manual)
4. PD_SPU_2010.chm (User manual in chm format)
"APPROVED"
Head of the State Administration - Center for Pension Payments
Pension Fund of the Russian Federation for the Smolensk region
____________________ V.G. Kolesnikov
DATA PREPARATION PROGRAM
PERSONALIZED ACCOUNTING SUBMITTED BY INSURANCE HOLDERS TO THE PENSION FUND OF THE RUSSIAN FEDERATION
(PD SPU)
FOR REGIONS OF THE CENTRAL FEDERAL DISTRICT
USER GUIDE
"Software code -"
“Document code – RP”
"Version number – 2.1.1 dated December 26, 2003"
Head of Development
A.I. Russin
"__" "___________" 2003
annotation
The PD SPU program is intended for the generation of individual (personalized) accounting documents by the policyholder in accordance with the instructions for filling out individual (personalized) accounting document forms in the state pension insurance system, approved by resolution Board of the Pension Fund of the Russian Federation, and preparing them for transfer to in electronic format V territorial body Pension Fund of the Russian Federation.
The program provides manual input and correction of data, generation of document forms approved by the Board of the Pension Fund of the Russian Federation, uploading in batch mode, printing them to a printer and to a file in DOS and Windows encodings, as well as printing blank forms.
This version of the program is aimed at PC/AT computers – 486/PI/PII/PIII/PIV, OS – MS Windows 9x/NT/2000/XP.
The nature of this manual assumes that the user is familiar with operating system Microsoft Windows95 - ...XP and has basic skills in working with it.
The user should be familiar with the following concepts:
Techniques for working with windows;
Working with the menu;
Using dialog controls;
Standard dialogues;
The concept of the Windows clipboard and how to work with it.
If you are not proficient in the above skills, we advise you to contact reference documentation by operating system.
1.1. Program operating modes 6
1.2. Description of the program window 6
1.3. Viewing master data while working with
program 7
2. Entering information about the organization 9
3. Entering individual information about length of service and contributions 10
3.1. Individual details 10
3.2. Work experience 10
3.3. Insurance premiums 12
3.4. Unloading information 13
4. Entering the insured person’s profile 15
4.1. Personal details 15
4.2. Place of birth 15
4.3. Identity document 15
4.4. Registration address 16
4.5. Residence address 17
4.6. Unloading information 17
5. Application for exchange of insurance certificate 18
6. Application for issuance of a duplicate insurance certificate 20
7. Entering information about the work experience of the insured person for
period before registration in the compulsory pension system 22
insurance
7.1. Information about work experience 22
7.2. Work experience 22
7.3. Calculation of experience 24
7.4. Unloading information 25
8. Generating and printing output forms 27
8.1. Printing blank forms 27
8.2. Statement of payment of insurance premiums 27
8.3. Printing individual information 28
8.4. Formation and printing of batches of documents 28
9. Filter installation 31
10. Mass adjustments 32
11. Database operations 34
11.1. Importing data 34
11.2. Data export 36
11.3. Reindexing 37
11.4. Data integrity check 37
11.5. Clearing deleted entries 37
11.6. Archiving 38
11.7. Archive recovery 38
12. Settings 39
13. Short description
cstructure and organization of the database 41
List of abbreviations and accepted notations used in this manual
PD SPU – a program for preparing personalized accounting data submitted by policyholders to the Pension Fund of the Russian Federation;
PF RF – Pension Fund of the Russian Federation;
GU - government agency;
OS – operating system;
DB – database;
Keyboard shortcuts. When a combination of two keys must be pressed to execute a command, it is given in the form Ctrl+
F3
. This entry means that you must first press the first key (in our example, Ctrl), then, without releasing it, press the second combination key (in our example, F3) to execute the command. The keys should be released in the reverse order.
Button labels. The names of the buttons in the dialogs are given by their names in the box, for example OK.
Key labels. Keys such as Enter, Esc, Del and the like are indicated by the names of the keys and are highlighted in bold.
To refer to the cursor keys (arrow keys), use the phrase "cursor keys" when you want to refer to all of these keys. If it is necessary to mention one of the cursor keys individually, the expressions “Up Arrow”, “Down Arrow”, “Right Arrow”, “Left Arrow” are used.
Designations of bookmarks (pages). To designate a bookmark (page) of a program window, use the name of the bookmark, highlighted in bold and underlined. For example: Unloading information .
1. General rules filling for all types of documents
1.1. Program operating modes
In the mode of adding records, the user must select in the left window using the left mouse button the desired entry, right-click to bring up the dynamic menu and select Add a note or click Ins, after which a record entry template will appear on the right side of the window.
In the record deletion mode, the user must select the desired record in the left window using the left mouse button, right-click to call up the dynamic menu and select Delete entry or click Del, after which, when asked by the program, either confirm the deletion or refuse it.
In the record editing mode, the user needs to place the cursor on the desired record in the left part of the window with the right mouse button, call up the dynamic menu and select Edit entry or click Enter(in the document, by default, when you select an entry, the entry editing mode is set).
Data types used:
Date - can be entered manually (for example, 01/01/02) or selected from the calendar, where using the arrows > select the year, - month, select the desired date in the row of numbers, press OK. By default, the current (system) date is suggested; it can be corrected if necessary. The date is entered in the format DD.MM.YY, where: DD is the day, MM is the month, YY is the year of the corresponding date (the last two digits).
Amount (number) – enter in the field or use a calculator;
String - enter into the text field (automatic substitution is carried out from the existing list);
Directory element – loaded from the codifier, or entered in the text field. All reference books for this program have an identical interface ( general form and control keys) and working with them is carried out according to a similar algorithm. All reference books of this program have an identical interface (general appearance and control keys) and work with them is carried out according to a similar algorithm. You can fill them out in document input mode.
To move between fields use Tab, inside the field - cursor control keys, as well as Home And End.
1.2. Description of the program window
When you start the program, the window shown in Fig. 1.2 appears on the screen.
The window contains the following zones:
Main menu (first top line of the screen);
Toolbar (second top line of the screen);
Type of document, reporting period and name of the enterprise (third top line of the screen);
List of insured persons (on the left side of the window);
Work area (on the right side of the window);
The status bar (in the last line of the window) displays the program operating mode, the number of records, and information about the enabled filter.
1.3. Viewing basic data while working with the program
Often when working with big amount records, data entry errors arise due to the presence of namesakes in the database, for example, there are 400 people at the enterprise, with 12 Ivanovs.
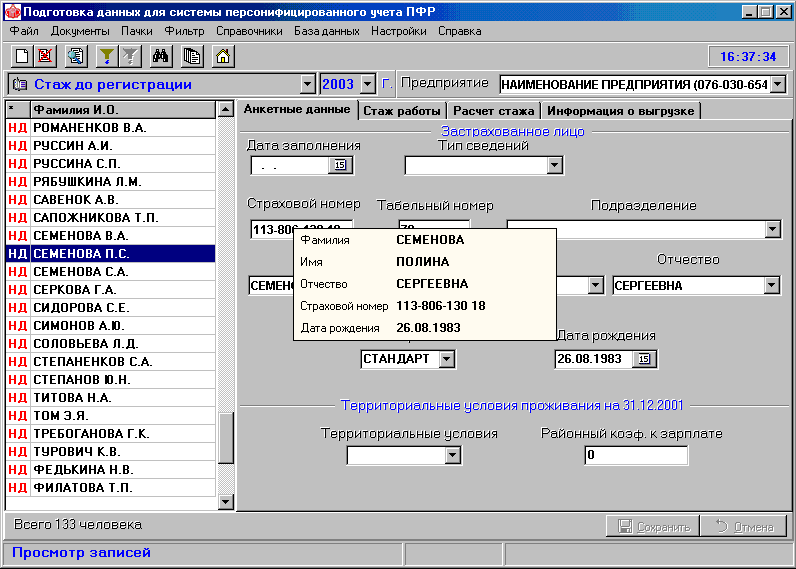
Fig 1.3
In order to check which record is being edited without going to the “Profile Data” tab, you need to press the key combination Ctrl+Space. A prompt window will appear (last name, first name, patronymic, insurance number and date of birth). See fig. 1.3
Entering information about the organization.
When you start the program for the first time, an input window appears necessary information about the organization. To move between fields use the key Tab .
If necessary, this information can be edited later ( Directories → Enterprises).
Consistently enter the data in the appropriate fields and press the ۷ button Continue.
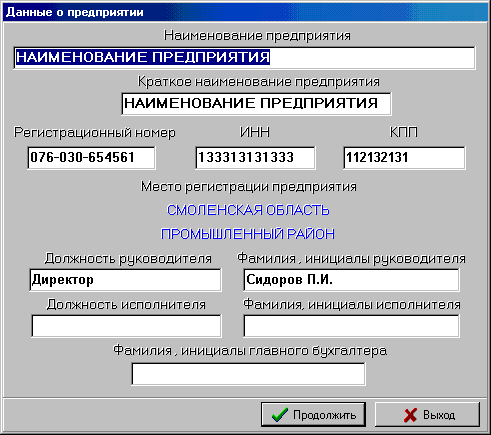
You can stop entering information at any time by clicking the Exit button. See fig. 2.1.
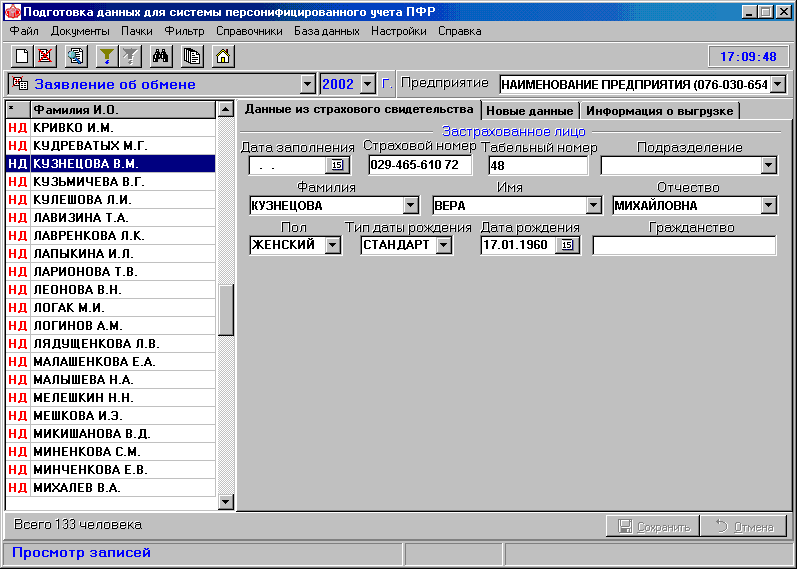
Entering individual information about length of service and contributions
3.1. Individual information
This mode is used to enter information about employees Documents → Individual information about length of service and contributions(Alt+F2).
When starting the program, the user automatically enters the mode Individual information . On the left side of the window there is a list of insured persons, on the right - information on the employee.
On the bookmark Individual information fields:
 rice. 3.1.
To save changes made click the Save button.
3.2. Work experience
On the bookmark Work experience
all records about the main and additional are displayed preferential length of service employee for the reporting period. To enter information about the length of service, you must click the Add button and select the type of record in the menu - “Main” or “Additional”. 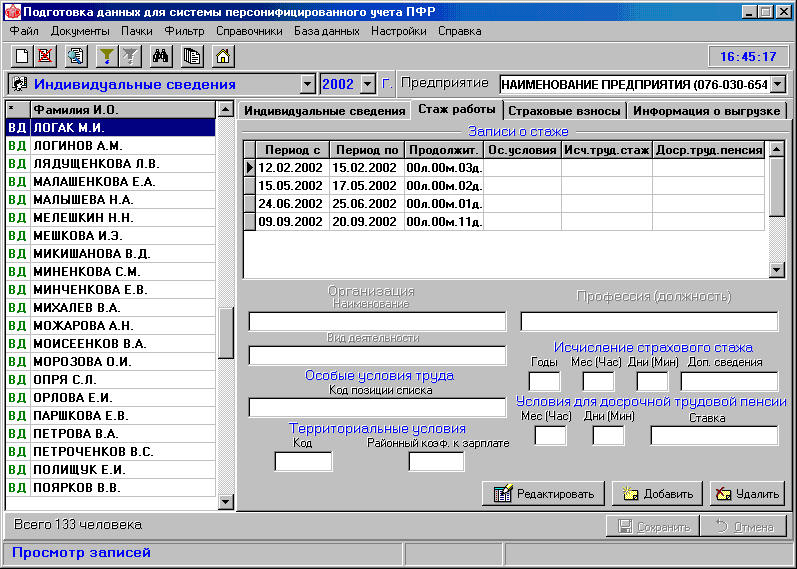
rice. 3.2.1.
In the window that appears, enter the length of service and, if necessary, additional parameters. Fields: Special conditions labor (bases), Calculus length of service(basis and additional information), Early appointment pensions (basis), Territorial conditions are selected from classifiers .
Field List item code not only is it filled in from the classifier built into the program, but it also allows you to enter values manually. The remaining fields must be filled in manually. Fields in which data entry is not possible become inactive. If there are input errors, a window describing the errors appears. and the field in which there is this error turns red. Recording data with an error is blocked. After entering all the data, click Save or Cancel if you want to discard the changes made.
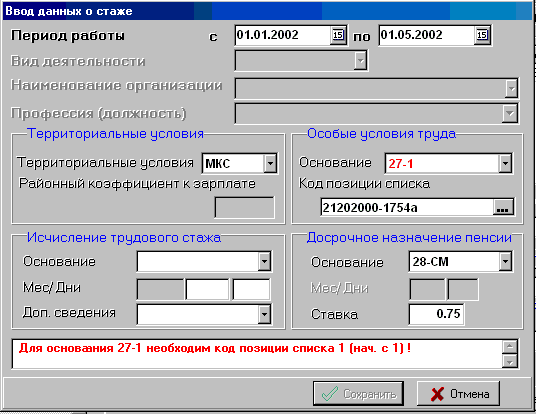
rice. 3.2.2.
3.3. Insurance premiums
On the bookmark Insurance premiums
The fields for the amounts of accrued insurance premiums and other reference data are filled in. Rice. 3.3. 
3.4. Unloading information
To do this, select the menu item "Packs" and click the Generate button. Here you can also check the packages by clicking the Check CheckPSN button. By clicking the Advanced button, you can set additional settings when forming packs.
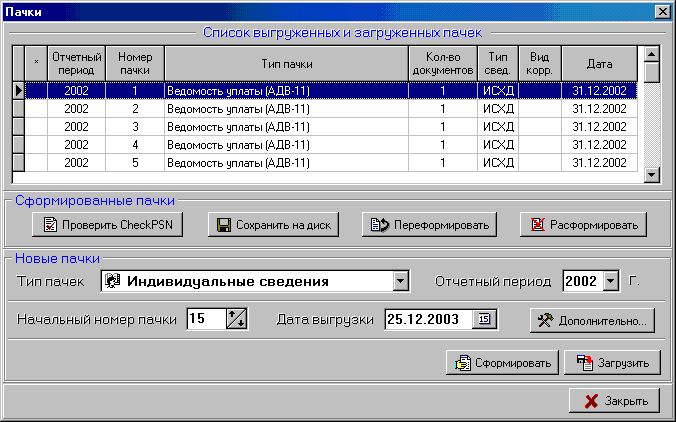
Rice. 3.4.
Entering the insured person's profile
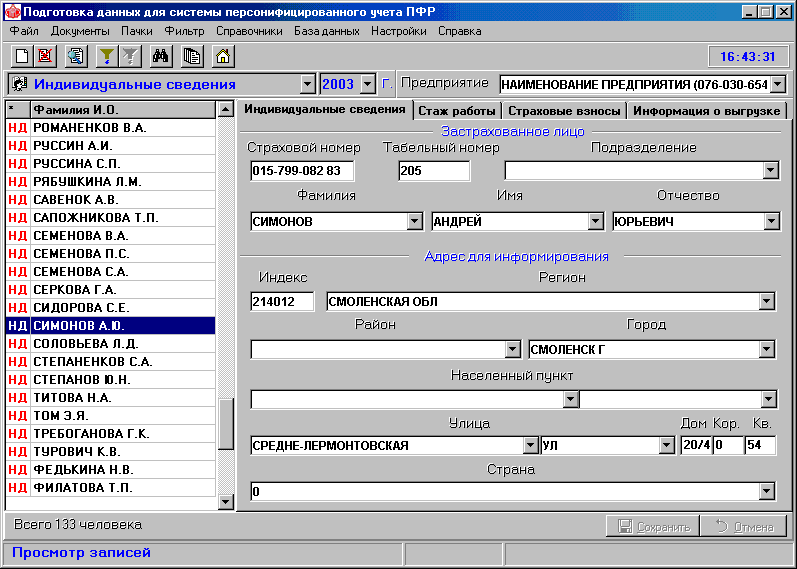
4.1. Personal data
This mode is used to enter personal data of employees Documents → Questionnaire of the insured person(Alt+F3).
On the bookmark Personal data fields: Floor, Date of birth type are selected from directories, the remaining fields are text fields and are filled in manually.
If the birth date type is standard, select from calendar, special-enter manually.
4.2. Place of Birth
On the bookmark Place of Birth
fields: Name of locality, district, region are selected from directories, the remaining fields are text fields and are filled in manually. 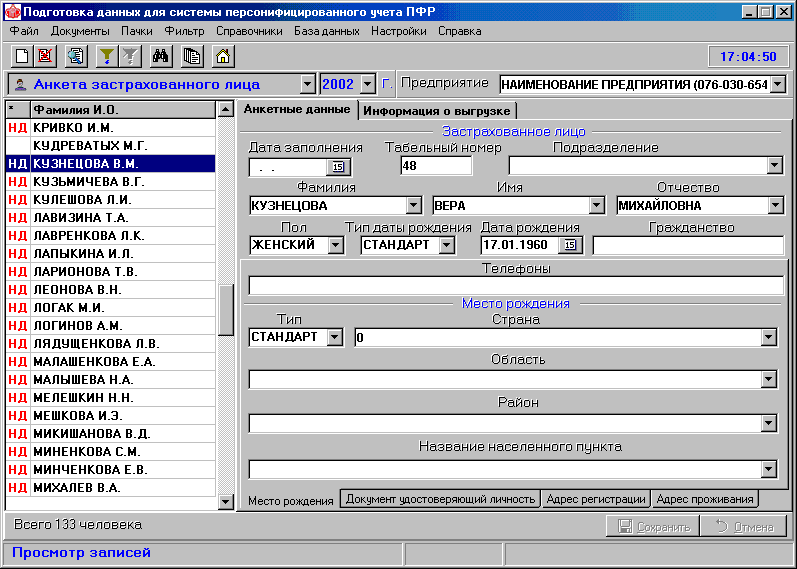 rice. 4.2.
If the personal data is not entered in in full a checkbox will appear on the left side of the window opposite the employee’s name ND– incomplete data. See Figure 4.2.
4.3. Identity document
On the bookmark Identity document
You must enter the details of your passport or other identity document. Rice. 4.3. 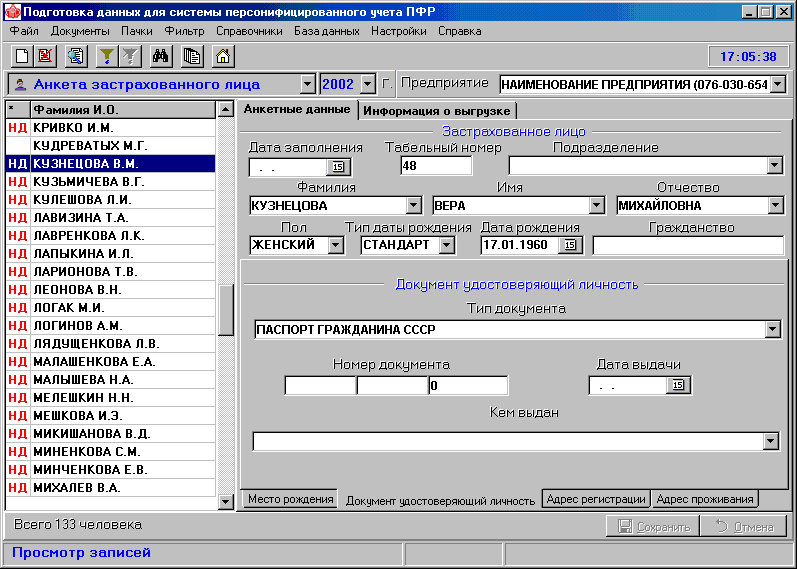
rice. 4.3.
4.4. Registration address
On the bookmark Registration address
fields: Country, Region, District, City, Locality, Street are selected from directories, the remaining fields are text fields and are filled in manually. You can copy the address to the “Residence Address” tab using the button to the address of residence 
rice. 4.4.
4.5. Residence address
Filled in if different from the registration address.
After entering all the necessary data or to save the changes, click Save. See fig. 4.4.
If not all personal data has been entered, a checkbox appears in the list field ND– incomplete data and uploading such data becomes impossible.
4.6. Unloading information
Information about uploading is filled in automatically when generating output forms.
Application for exchange of insurance certificate
This mode is used to enter an application for the exchange of an insurance certificate for an employee.
Documents → Application for exchange of insurance certificate(Alt+F6). Rice. 5.1.
rice. 5.1.
On the bookmark New personal data
Date of completion, Place and Date of birth, Identity document.
If fields change: Surname And Place of Birth, then in the fields accordingly Cancel middle name And Cancellation of place of birth the parameter is set CANCELLATION . The remaining fields are filled in if the information on the insurance certificate changes. See fig. 5.1.
To view the application for a duplicate insurance certificate, click on the button.
To print you need to go to the menu item "Packs" and click the Generate button and then print.
6. Application for issuance of a duplicate insurance certificate
This mode is used to enter an application for a duplicate insurance certificate.
Documents → Application for issuance of a duplicate insurance certificate(Alt+F5). 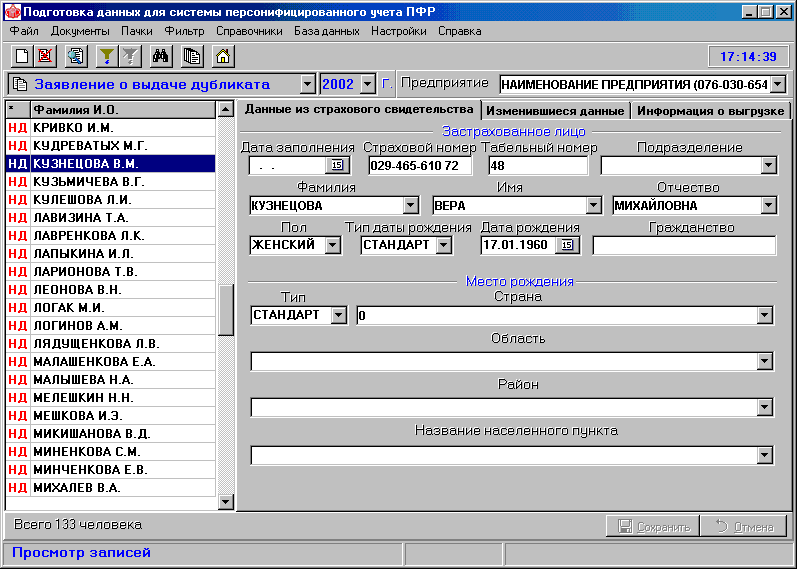 rice. 6.1.
On the bookmark Changed data
The following fields must be filled in: Date of completion, Provision of information, Place and date of birth, Identity document.
If fields change: Surname And Place of Birth, then in the fields accordingly Cancel middle name And Cancellation of place of birth the parameter is set CANCELLATION . The remaining fields are filled in if the information on the insurance certificate changes. See fig. 6.1.
To print an application for a duplicate insurance certificate, click on the button and first go to the menu item "Packs" and click the Generate button. To exit print mode - .
Entering information about the work experience of the insured person for the period before registration in the compulsory pension insurance system
7.1. Information about work experience
On the bookmark Personal data
fields: Adjustment type, Date of birth type, Territorial conditions are selected from directories, the remaining fields are text fields and are filled in manually. 
rice. 7.1.
To save the changes made, click the Save button. See fig. 7.1.
Work experience
On the bookmark Work experience
all records of periods of labor or other socially useful activities of the employee are displayed. To enter information about the length of service, you must click the Add button and select the type of record in the menu - “Main” or “Additional”. 
Fig.7.2.1.
In the window that appears, enter the length of service and, if necessary, additional parameters. Fields: Type of activity, Special working conditions (grounds), Calculation of length of service (grounds and additional information), Early assignment of pension (grounds), Territorial conditions selected from classifiers .
Field List item code not only is it filled in from the classifier built into the program, but it also allows you to enter values manually. For fields Name of organization, profession you can select values from those previously entered for this employee. The remaining fields must be filled in only manually. Fields in which data entry is not possible become inactive. If there are input errors, a window describing the errors appears. and the field in which this error is present turns red. Writing data with an error is blocked
To save the changes, click the Save button to discard them Cancel. 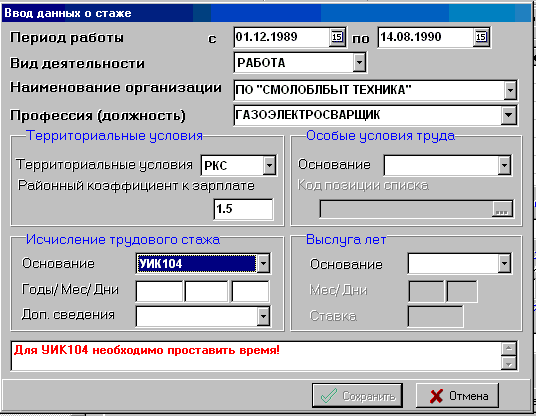
Fig.7.2.2.
Note: Additional entries information about preferential experience can be entered only after filling out the main experience field.
7.3. Calculation of experience
On the bookmark Calculation of experience
displays information as of January 1, 2002 for evaluation pension rights the insured person. The information on this tab is intended for viewing only and is the result of information entered by the user about the periods of the employee's activity.  rice. 7.3.
7.4. Unloading information
Information about uploading is filled in automatically when generating output forms. 
Rice. 7.4.
Generating and printing output forms
8.1. Printing blank forms
This mode is intended for printing blank forms of individual information forms SZV-4-1, SZV-4-2. ADV-1 personal data. applications for exchange (ADV-2) and for the issuance of a duplicate (ADV-3), information about the length of service for the period before registration (SZV-K) and a list of documents (ADV-6-1).
To print blank forms through the main menu:
File → Print blank forms → Individual information (form SZV-4-1).
8.2. Statement of payment of insurance premiums
This mode is designed for forming and printing summary statement payment of insurance premiums of insured persons
Packs → Statement of payment of insurance premiums.
To generate a statement, you must click the Generate button.  rice. 8.2.
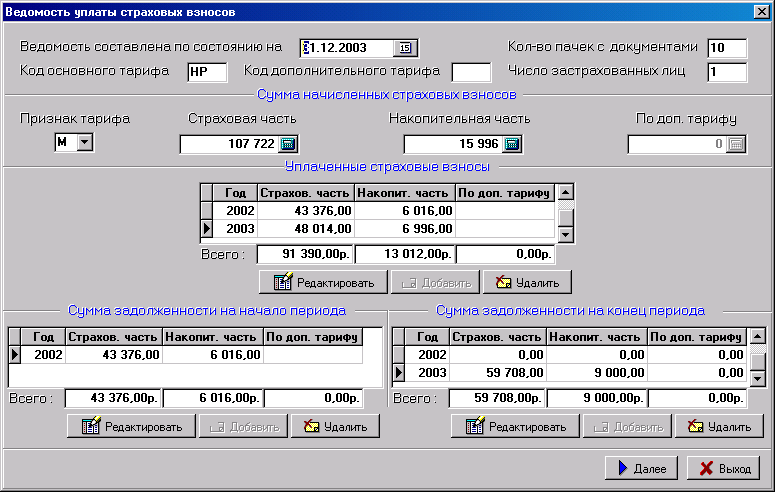
To print the document, click Next .
See fig. 8.2.1
A printed form of the document will appear in the viewing window; to print, press the button, to exit the printing mode - .
Printing individual information
To print individual information for one employee using the SZV-4-2 form, you need to place the cursor on the desired entry in the left part of the window and press the button Space, then in the menu item Filter set a filter, and then, when a list of one or more people remains on the screen, go to the menu item Packs and click the Generate button.
A printed form of the document will appear in the viewing window; to print, click on , to exit print mode - .
Formation and printing of bundles of documents
This mode allows you to upload packs of documents of all types supported by the program: personal data, individual information, an application for a duplicate, an application for the exchange of an insurance certificate.
To upload documents in batch mode, you must use the menu item Packs.
For the task additional installations Click the Advanced button. 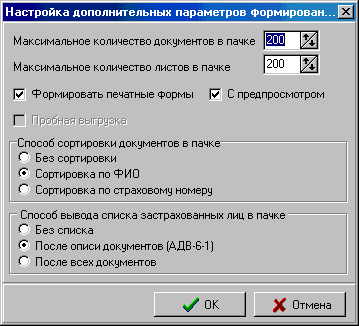
rice. 8.4.1
Unloading of bundles into a file is carried out simultaneously with the formation of a printed form of documents. If the settings specify checking before printing with the CheckPSN program, then a protocol for checking the generated packet will be issued before viewing.
After each batch is formed, the unloading protocol window is displayed on the screen. See fig. 8.4.2 
For uploaded documents, after the batches are formed, a checkbox is selected in the list of insured persons field VD. To delete information about unloading, you need to go to the tab Unloading information
Click for individual information Clear.
9. Filter installation
Menu item Filter → Set filter(Alt+F) allows you to work with selected records (Ctrl + Left mouse button) or those database records that meet the selection criteria set in this paragraph.
In the window that appears, select a filter condition and click Install .
If you need to download not all information, but only those that satisfy a given criterion, then you must install a filter before downloading. 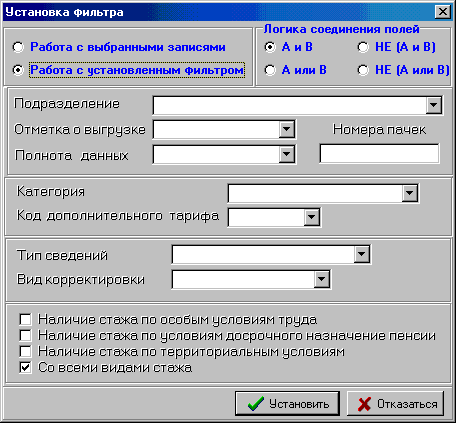
rice. 9.1.
Menu item Filter → Cancel filter(Alt+O) allows you to disable the filter.
Information about turning the filter on/off is displayed in the status bar. See fig. 9.1.
10. Mass adjustments
Operation Mass adjustments is intended for batch correction of data for a list of employees. If you need to change data for several employees, you must set a filter for them before making the adjustment.
You can enter the mass adjustment mode by clicking on the button or through the main menu:
File → Bulk Adjustments → Individual Details
This menu item allows you to change address information for all employees.

In the window that appears, enter in the position next to the field of individual information to be adjusted, you must check the box, enter the value and click Execute. See fig. 10.1.
Menu item File → Mass adjustments → Experience information allows you to add to en masse record of basic experience. 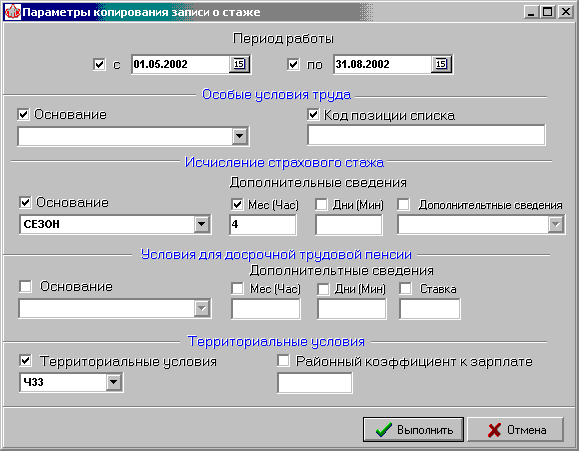
rice. 10.2.
In the window that appears, enter the work period for additional information in the position next to the parameter name, you must check the box, enter the value and click Execute. See fig. 10.2.
Menu item File → Mass adjustments → Insurance premiums allows you to change the employee category, code on a mass scale additional tariff, type of information, type of adjustment and other parameters. The procedure is the same as for previous paragraph.
Menu item File → Bulk adjustments → Clear upload information allows you to clear upload information for all employees represented in the list. You will be prompted for confirmation before doing this.
Before executing a menu item File → Bulk adjustments → Delete selected records it is necessary to select the employees to be deleted (Ctrl + Left mouse button). You will then be asked to confirm the deletion.
11. Database operations
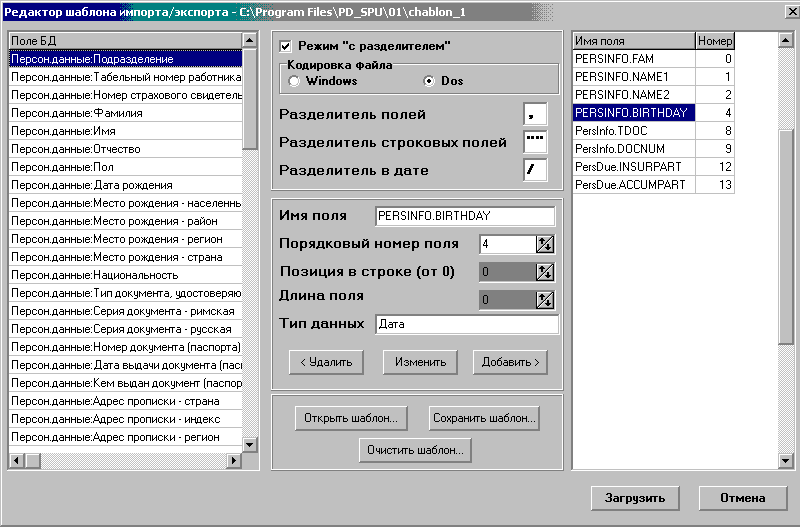
11.1. Importing data into the database
Operation "Import"
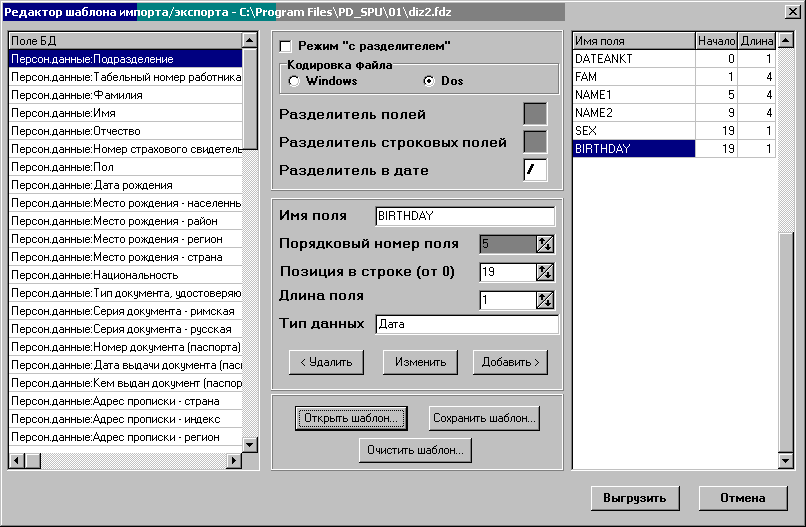
(File → Import(Alt+I) allows you to load data from data files in the PFR format and DBF files into the program database. After selection of this paragraph In the window that appears, you must select the format of the downloaded file. 
To import a formalized file in PFR format, check the box
From data files in PFR format and then you need to specify the path to the data file. (See Fig. 11.1.1.)If you plan to load from a DBF file, you must check the box FromDBF-files, specify the path to the data file and click Execute .  rice. 11.1.2.
In the window that appears, establish a correspondence between the fields of the external DBF file and the fields of the database of the PD SPU program. (See Figure 11.1.2.)
To import data, it is necessary that all downloaded data ( personal information, insurance premiums: insurance, funded parts, length of service) were in one DBF file.
In the left part of the window (“From”), you need to select the name of the field of the downloaded file with the left button, then in the right part of the window (“Where”) select the corresponding field of the persinf.dbf file and click Add etc.
Please note the checkbox
Source data inWindowsencoding
If the source file is in DOS encoding, the checkbox must be unchecked.
After completing the settings, click Execute .
For import text file check the box
From text files, then you need to specify the path to the data file, click Execute .
In the window that appears, configure the fields of the external text file:
Select the encoding type of the source file (DOS, Windows);
Select the file type (delimited, without delimiters);
If the source file has delimiters, then set the appropriate flag, define the type of delimiters, in the left part of the window you need to select the name of the field of the loaded file with the left button, define serial number fields (counting from "0") press Add etc. (Fig. 11.1.3.) .
If the source file is without delimiters, then turn off the flag, in the left part of the window you need to select the name of the field of the downloaded file, determine the position in the line (from "0") and the length of the field and click Add.
You can also change or delete loaded fields.
To download a text file, click the button Download. (Fig. 11.1.3.) .
rice. 11.1.3.
To download data from the Orenburg program "SPU_PRED"
0.Install the program PD_SPU (Smolensk). Enter company information.
1.The CNV_NLG.EXE program written by Orenburg creates
BASE2003\SPISOK.DBF, downloaded data for "Taxpayer".
2.In the PD_SPU program, select "File-Import-From DBF files-"Spisok.DBF"-open"
3.Upload the ImpField.txt template and click “Run”
To export to a DBF file, you need to check the appropriate box and specify the path to the file. In the window that appears, configure the upload (see “Import” above).
To export to a text file, you need to check the appropriate box
vto a text file specified by the template, determine the path to the file.
In the window that appears, configure the upload (see above “Import from TXT”).
The same template can be used for import and export.
To upload a text file, click the button Unload. See fig. 11.2.
11.3. Reindexing
Menu item Database → Reindexing allows you to rebuild index files in case of distorted data display in program windows.
11.4. Integrity check
Menu item Database → Integrity Check allows you to check data for correctness.
11.5. Clearing deleted entries
Menu item Database → Clear deleted records allows you to physically delete records previously marked as deleted from a file (using the Del records are only marked as deleted, but are not physically deleted from the database). The operation is irreversible!!!
11.6. Archiving
Menu item Database → Database Archiving allows you to create a ZIP archive of a catalog with information base organizations (ORGx).
When you select this menu item, a message is displayed that contains the file name (corresponds to the date the archive was created) and the location of the database archive.
After confirmation, archiving is performed and a message indicating the successful creation of the archive is displayed.
11.7. Restoring from an archive
Menu item Database → Restore from archive allows you to restore data from an archive.
After selecting this menu item, you must specify the path to the archive with the information base.
12. Settings
This menu item is intended for setting paths to the database. 
On the first tab Are common
checkbox should be checked if necessary
v Use KLADR to fill in address information
vCheck the intersection of periods of seniority (do not check, warning, error) used when working with information for the period before registration (form SZV-K).
v Use the key to move through the fields,
On the second tab Catalogs
it is necessary to configure the paths to the database directory, report templates, database archive, and KLADR directories.
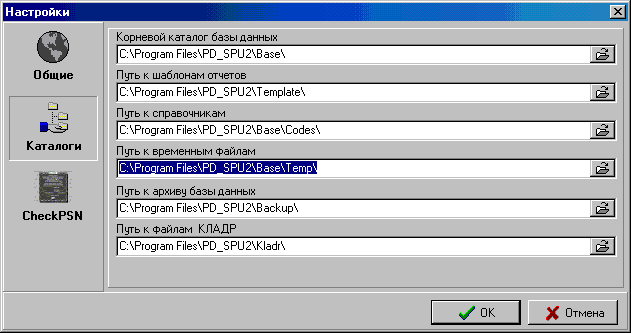
rice. 12.1.
On the bookmark ProgramCheckPSN You can set file checking options and specify the path to the CheckPSN program and its launch parameters. More information about CheckPSN launch options can be found in the documentation supplied with this program. 
Figure 12.2
13. Brief description of the structure and organization of the database
The database is a collection of .dbf files stored in a directory tree. In the root directory of the database files there is a data file about enterprises, which contains directories with data files about employees of each enterprise. The name of such a directory is: ORGx, where x is the serial number. The ORGx directory contains subdirectories of billing periods that have a name corresponding to the period, for example 2002, and a file about the company’s employees persinf.dbf, the data of which is valid for all periods.
The period directory contains all personal data files specific to a specific period. The path to the database must be specified in the ini file with the BASEPATH label.
The directory files are located in a separate directory, the path to which must be specified in the ini file labeled CODEPATH.
Also in the ini file are written the paths to temporary files, files printed forms and uploaded formalized files, form files with TEMPLATE marks.
If there is no ini file, the latter is created automatically the first time you start the program, and the necessary paths are written as a subtree of the current directory.
According to the principle of operation, the database is relational. For each data file there is an index file, the name of which is the same as the data file, and the extension is .xbf.
For the program to work, it is enough to have the pd_spu.exe file, the Base\Codes, Template directories. When you first start the program, an ini file, a directory with the ORGx information base, and a file about the company’s employees, persinf.dbf, are automatically created.
| CHANGE REGISTRATION SHEET |
|||||||||
| Sheet (page) numbers | Total sheets | N doc | In. N and date | Signature | date |
||||
| Replaced | New | rovanized |
|||||||


- Sample plan for writing a speech therapist report
- Letter M, m. Consonant sound i. Letter M, m Corrective and developmental
- Articulation exercises
- What does it mean to go to the panel?
- Pythagoras - Olympic champion What kind of sport did Pythagoras engage in?
- What did a kisser do in Rus'?
- Tselovalnik - a mysterious profession of ancient Rus'
- The creator of geminoid robots, Hiroshi Ishiguro, will give lectures at Skoltech
- Hiroshi Ishiguro - Japanese engineer, creator of humanoid robots
- Measurement of gamma background in places of residence of the population of rural and urban settlements in the southwestern regions of the Bryansk region
- The latest photos from the Hubble telescope
- How to bake a meat pie - step-by-step recipes for preparing dough and filling with photos
- Pike cutlets "Original"
- What color were the insects you saw?
- Delicious snacks with a spicy touch: preparing salads with Korean carrots
- What is binge drinking: symptoms Alcoholic during binge drinking
- Psychosomatic factors of thyroid diseases Psychological causes of thyroiditis
- Tower coastal batteries of Sevastopol 30th coastal battery
- Liberation of Belarus - Operation Bagration
- Lucy Stein's new moment of fame